This guide explains how to create maps for Unturned.
Intro
Maps in Unturned are the worlds that players can explore in both single and multiplayer. There is a built-in level editor available on the main menu for you to easily create your own map. Instructions on how to use it are available below.
General
Once the editor is loaded up you can navigate your world by holding the right mouse button. While holding the right mouse button you can look around as if in-game and the press the directional keys to move around. The sprint key can be used to move more quickly.
To save changes to your map open the menu with escape and click save.
Terrain
Heights
The heights tool is used to modify the height of the ground in your level. It can adjust both the primary terrain which is the one the player walks on and the secondary terrain which is shown in the far distance. Which terrain you are editing can be swapped by clicking the primary/secondary button.
There are several parameters that can be tweaked when editing the terrain:
- Size: This is the size of the terrain painting brush. A larger size will impact a larger area when painting.
- Strength: This is how quickly the tool will act on the terrain. A higher strength will cause changes to occur more quickly, whereas a lower strength allows fine tuning.
- Height: This is only used for the flatten tool. It represents a percentage of the level height, such that 100% is the top of the world and 0% is below sea level.
To actually edit the terrain you can use one of the following tools:
- Raise: This pulls the terrain up out of the ground.
- Lower: This pushes the terrain back into the ground.
- Smooth: This averages out the terrain to smooth it.
- Flatten: This forces the terrain towards a specific height as set with the height option.
Once a tool is selected and the parameters are configured you can hold down left mouse button to paint on the terrain.
Materials
The materials tool is used to paint the ground in your level. Its operation is similar to the heights tool in that a brush is used to edit specific areas, and both the primary/secondary terrains can be modified. You can select which texture you would like to paint with on the right hand side.
If you would like to save time and make the materials more consistent on your map you can automatically generate them based on the environment. This is done by clicking the bake button in the bottom right.
There are several parameters that can control the baking process:
- Overgrowth: The amount of foliage allowed to generate on this material.
- Steepness: The minimum steepness before this material is generated.
- Height: The maximum height before this material is not generated.
- Foundation: Whether this material goes underneath objects.
- Generated: Whether this material should be painted or not.
Once the parameters are configured you can bake globally which generates the entire terrain and blurs it, or locally to preview it in the area around the camera.
Custom materials can be used by creating 8 .jpg images with read/write enabled and bundling them as a replacement for the Materials.unity3d file found in Level/Terrain.
Details
The details tool decorates the materials in your level with small meshes and textures. These are only available as being baked.
There are several parameters that can control the baking process:
- Density: How many should be created in a patch.
- Chance: The probability of this appearing in a patch.
Once the parameters are configured you can bake it to see how it will look.
Custom details can be used by creating any number of .png files or meshes with read/write enabled and bundling them as a replacement for the Details.unity3d file found in Level/Terrain.
Resources
The resources tool populates the materials in your level with large destroyable models. You can select which resource you would like to place on the right hand side.
If you would like to save time and make the resources more consistent on your map you can automatically generate them based on the environment. This is done by clicking the bake button in the bottom right.
There are several parameters that can control the baking process:
- Density: How many should be created in a patch.
- Chance: The probability of this appearing in a patch.
- Radius: How far away from the cursor resources should be removed.
Once the parameters are configured you can bake globally which generates the entire terrain, or locally to preview it in the area around the camera.
To manually place/remove resources you can use the following tools:
- Add: This spawns resources.
- Sub: This removes resources within the radius.
Once a tool is selected and the parameters are configured you can click to add/remove resources. Any manually placed resources are not cleared when resources are re-baked.
Environment
Lighting
The lighting tool is used to configure the skybox in your level. You can select which time of day to edit on the right.
There are several parameters that can be tweaked when adjusting lighting:
- Azimuth: This is the angle the sun comes from.
- Bias: This is the ratio between day and night.
- Fade: This is how long each time blends together.
- Sea Level: This is how high the water comes to. Setting this to 1 disables water.
- Snow Level: This is how low the snow comes to. Settings this to 0 disables snow.
- Time: This allows you to preview a specific time on your map.
- Sun: The color of the sun's light and rays.
- Sea: The color of the ocean.
- Fog: The color of the height fog.
- Top Sky: The color of the sky.
- Middle Sky: The color of the horizon. This should usually be the same color as your fog.
- Bottom Sky: The color of the void. This should usually be the same color as your water.
- Top Ambient: The minimum light from above.
- Middle Ambient: The minimum light from the middle.
- Bottom Ambient: The minimum light from below.
- Intensity: This controls how bright the sun is.
- Fog: The amount of fog above the ocean level.
- Clouds: The density of cloud cover.
- Shadows: The darkness of shadows. This should usually be 0 for dawn, dusk and midnight.
Roads
The roads tool is used to place paths that conform to the terrain in your level. You can select which road you would like to place on the right.
Once a road is selected you can start a path by clicking in the level. With an end node selected you can click again to create a connection. You can press E with a node selected to move it, or W to split it into multiple nodes for smoothing. An entire path can be deleted by pressing ctrl and delete.
There are several parameters that can be tweaked when adjusting roads:
- Width: The width of the road.
- Height: The scaling of the texture along the direction.
- Depth: How tall the road is.
Once the parameters are configured you can bake the roads to preview meshes generated for your paths.
Custom roads can be used by creating images with repeat enabled and bundling them as a replacement for the Roads.unity3d file found in Level/Environment.
The navigation tool is used to provide pathfinding information for zombies.
Clicking in the world creates a navigation flag. These can be selected to configure its area. You can press E with a flag selected to move it. The white border represents the pathable area, while the pink border is where it begins loading zombies. It is recommended to avoid having pink areas overlap as much as possible, and to give each location on your map some buffer area around the zombie spawns to allow the zombies to chase players away.
There are several parameters that can be tweaked when adjusting flags:
- Width: The width of the navigation area.
- Height: The height of the navigation area.
Once the parameters are configured you can bake the flag to generate a navmesh for the specified area.
Nodes
The node tool is used to place special information about your level.
Clicking in the world creates a node. Clicking on a placed node will select it. You can press E with a node selected to move it. You can press 'delete' on a node to remove it. Click the button at the bottom left corner of the screen to change the type of node.
The current types of nodes are:
Location - Allows the naming of a location. Once placed, a box at the upper right corner of the screen will appear. This is the name of the node.
The name used will be shown centered over the node's location on charts and GPS.
Also used for the teleportation command. i.e: @Teleport <PlayerName>/<NodeName>
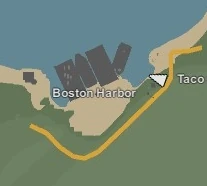
Example of a location node. As seen from a chart.
Deadzone - Creates an 'Irradiated' area in which the player will lose immunity over time.
Once selected, The radius can be adjusted to make larger, or smaller areas.
More information on Deadzones and their locations on official maps can be found here.
Purchase - Purchase nodes allow players to purchase items with experience.
Radius - Changes the area a player has to exist in to preform the transaction.
ID - The ID of the item you want purchased.
Cost - The cost of the item in experience points.
When a player enters the specified area, they will be prompted in the form of a message box near the bottom of the screen. It will tell the player the item that can be bought, and the cost.
i.e: If you typed in '4' for ID and '150' for cost, you will get this:
Eaglefire - 150
When the action key (default F) is pressed, the player would receive an Eaglefire, and lose 150 EXP.
Note: This will work for any item, not just guns.
If the player already had the gun (Eaglefire), they would receive the proper magazine for the gun. (Military Magazine)
This transaction can be repeated indefinitely, so long as the player has adequate experience.
Safezone - A safe area where players cannot harm, or be harmed.
Radius - Determines the area that the Safezone encompasses.
Height - Determines whether or not the radius continues upwards.
Unlike Safezone Radiators, Safezone nodes allow zombies and items to spawn. Players in the radius are unable to attack with any weapon, and zombies attacking players will not deal any direct damage. However, they will still decrease a player's sickness.
Airdrop - A location where a care package can be air dropped.
Spawns
Animals
The animals tool is used to place animal spawns in your level. On the right you can configure your animal spawns, starting by creating a table.
Tables represent a category of spawns, and can be color coded to make differentiation easier. Within a table you can add tiers which represent varying levels of rarity when choosing what to spawn. Each tier can have its weight adjusted, and doing so automatically adjusts the weight of other tiers. Animal IDs are added to tiers, and each one in a tier is weighted evenly.
There are several parameters that can be tweaked when adjusting spawns:
- Radius: How far away from the cursor spawns should be removed.
To manipulate spawns you can use one of the following tools:
- Add: This spawns animals.
- Sub: This removes animals within the radius.
Once a tool is selected and the parameters are configured you can click to add/remove animals. It is recommended to place animal spawns away from complex geometry, as unlike the zombies they have no global pathfinding and therefore no guarantee of logically navigating the environment.
Items
The items tool is used to place item spawns in your level. On the right you can configure your item spawns, starting by creating a table.
Tables represent a category of spawns, and can be color coded to make differentiation easier. Within a table you can add tiers which represent varying levels of rarity when choosing what to spawn. Each tier can have its weight adjusted, and doing so automatically adjusts the weight of other tiers. Item IDs are added to tiers, and each one in a tier is weighted evenly.
There are several parameters that can be tweaked when adjusting spawns:
- Radius: How far away from the cursor spawns should be removed.
To manipulate spawns you can use one of the following tools:
- Add: This spawns items.
- Sub: This removes items within the radius.
Once a tool is selected and the parameters are configured you can click to add/remove items. It is recommended to put some spawns in obvious places, while hiding rarer items under beds or around furniture.
Zombies
The zombies tool is used to place zombie spawns in your level. On the right you can configure your zombie spawns, starting by creating a table.
Tables represent a category of spawns, and can be color coded to make differentiation easier. Within a table you can add clothing IDs to each slot and adjust the chance of a zombie wearing it. Any clothing not covered by a specific slot can be placed under gear. Keep in mind that zombie textures are baked when the level is loading, so the more shirts/pants are added the more memory is required. For this reason it is recommended to split civilian zombies into weather groups rather than giving all civilians all clothes.
There are several parameters that can be tweaked when adjusting spawns:
- Mega: Whether this table spawns mega zombies.
- Health: How much health these zombies spawn with.
- Damage: How much damage these zombies deal.
- Loot: The index of the item table these zombies drop.
- Radius: How far away from the cursor spawns should be removed.
To manipulate spawns you can use one of the following tools:
- Add: This spawns zombies.
- Sub: This removes zombies within the radius.
Once a tool is selected and the parameters are configured you can click to add/remove zombies. It is recommended to keep zombie spawns out of buildings, as it can be frustrating for players to find zombies in buildings they fortified. Zombie spawns should not be placed outside of navigation areas, or they will be ignored.
Vehicles
The vehicles tool is used to place vehicle spawns in your level. On the right you can configure your vehicle spawns, starting by creating a table.
Tables represent a category of spawns, and can be color coded to make differentiation easier. Within a table you can add tiers which represent varying levels of rarity when choosing what to spawn. Each tier can have its weight adjusted, and doing so automatically adjusts the weight of other tiers. Vehicle IDs are added to tiers, and each one in a tier is weighted evenly.
There are several parameters that can be tweaked when adjusting spawns:
- Radius: How far away from the cursor spawns should be removed.
To manipulate spawns you can use one of the following tools:
- Add: This spawns vehicles.
- Sub: This removes vehicles within the radius.
Once a tool is selected and the parameters are configured you can click to add/remove vehicles.
Level
Objects
The objects tool is used to place models in your level. You can select which model you would like to place on the right. Available models can be filtered by size or name.
Once a model is selected you can press the E key to spawn it at the cursor position.
Existing models can be selected by clicking on them in the world, or dragging a box around a group of objects. More models can be added/removed from the selected group by holding shift.
While a placed object is selected it can be moved to the cursor with the E key, have its transform copied with the B key or applied with the N key. When moving or rotating an object the ctrl key can be hold to snap it to a grid.
There are several parameters that can be tweaked when adjusting objects:
- Snap Transform: This is the distance between grid segments when moving.
- Snap Rotation: This is the angle between grid segments when rotating.
- Global/Local: This determines which coordinate system is used when manipulating objects. Global uses the world space coordinates, whereas Local uses the first selected object's orientation.
To manipulate objects you can use one of the following tools:
- Transform: This moves an object.
- Rotation: This rotates an object.
Once a tool is selected and the parameters are configured you can click and hold the handles visible around objects to manipulate them.
Visibility
The visibility tool is used to reduce clutter when working on a detailed level. Each tool's helper handles visibility can be toggled on the right.
Players
The players tool is used to place player spawns in your level.
There are several parameters that can be tweaked when adjusting spawns:
- Radius: How far away from the cursor resources should be removed.
- Angle: The orientation of the player when spawned.
To place/remove spawns you can use one of the following tools:
- Add: This spawns players.
- Sub: This removes players within the radius.
Once a tool is selected and the parameters are configured you can click to add/remove players.
Extra
You also have the option to provide some extra information about your map for players:
From the in-editor pause menu you can click the "Map" button to generate an overview of your map used when players open their information tab in-game. This is stored as Map.png file in your level folder, and can be modified to add more details or overwritten to give it a graphic style.
An Icon.png file can be provided in the level folder to be shown on the level list in-game, as well as a Level.png file to be displayed when loading your level. If you want to change the loading text you can localize your level by providing language files with the keys Secure, Insecure, Loading_Server and Loading_Editor.